How long?
2days, 1 night
How many miles?
27 miles / 43km
How?
Hiking + wilderness / backcountry camping
Map required, compass optional (i.e. well maintained & sign-posted trails & prominent features all around; still I would carry a compass just in case)
Maps?
National Geographic Trails Illustrated Map #268
Itinerary:
Summit Lake trailhead -> Corral Meadow -> Grassy Swale -> Horseshoe Lake -> Snag Lake -> Cinder Cone -> Twin Lakes -> Echo Lake -> Summit Lake trailhead
On top of paying your park admission fee, you will need a backcountry permit for any overnight stay in the Lassen Volcanic wilderness. These are free and there are no quotas, so you don’t have to get them in advance. Just turn up at a ranger station / visitor center (there is one at either entrance of the park on highway 89) and get yours. There is also a ranger station at Summit Lake, but, to my knowledge, they do not issue permits there. You will also need a bear canister for your food.
Leg 1: Summit Lake -> Horseshoe Lake -> Snag Lake
It’s always embarrassing when you get lost right at the start of a hike, particularly if there are still buildings and campgrounds nearby. But that’s what almost happened to me. You need to start at the Summit Lake trailhead, which is a bit north along route 89 from Summit Lake South and North campgrounds. Then the first two-thirds of a mile takes you around both campgrounds and off on the trail to Corral Meadow. The trail to Echo Lake (where you’ll come back from the next day) is impossible to miss and sign-posted. However at Summit Lake South campground there are so many unofficial tracks (both human and animal I would guess) that go off into the forest, that it is not quite clear which is the track you need to take. Anyway, I did about 200-300 meters on the wrong side of Summit Creek, then quickly noticed my mistake after consulting the map and bushwhacked my way back onto the correct trail. From that point on, route finding is easy and every trail crossing is clearly sign-posted.
The first leg of the loop is mostly through dense forest, which occasionally opens up to reveal a meadow or a lake. There are plenty of water sources along the route, so you do not need to carry much onto the hike with you (do use a filter though).
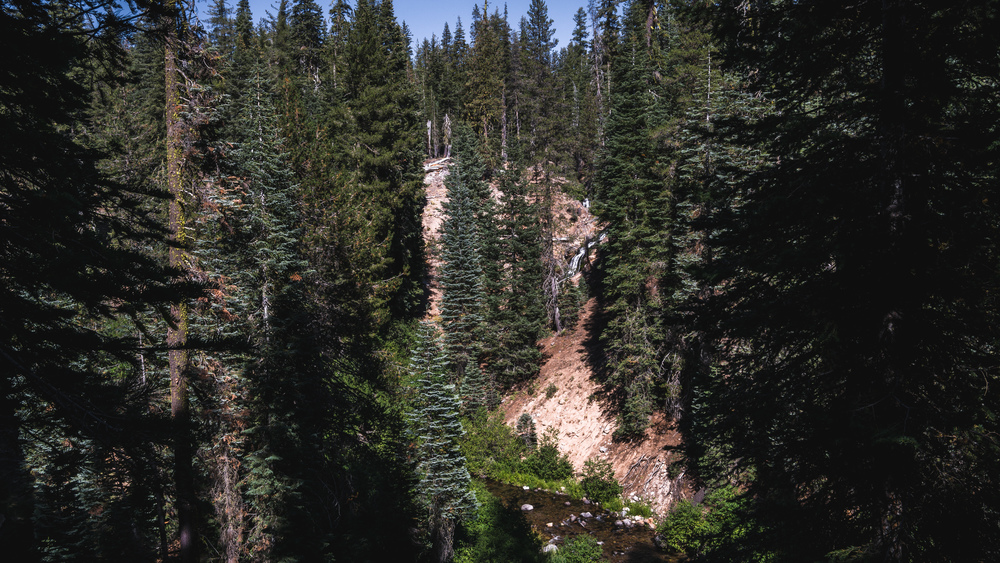
The first few miles are mostly downhill as you follow along Summit Creek. Just before you get onto the Pacific Crest Trail (PCT), look to your left, on the far side of the narrow valley that Summit Creek has carved and there should be a nice waterfall not indicated on the map. Right after the junction with the PCT, you will need to ford Summit Creek (yes you will get your feet wet, but, at least in mid-September, it is not a dangerous crossing: the water is fairly shallow and not too fast flowing) and head north. Near the trail junction should be Corral Meadow, but I did not see it, so I guess it is a bit further south on the PCT. After the creek fording there is a bit of an uphill section before you get to Grassy Swale, which is boardwalked in places. Continue along and watch out for deer, wood peckers and the occasional bird of prey. At the next junction, you need to take the much smaller right fork, sign-posted for Horseshoe Lake. Continue along the trail until you get to the Lake. If you set off in the early afternoon like me you should get here in late afternoon with the sun’s reflections in the water blinding you when you look across the water from the western shore. Here will be another crossing and you need to head north on Grassy creek Trail towards Snag Lake. When I did this trip, there were many deer in the grass along the creek, so watch out for them. There will be two more crossings, and each time you just continue straight, due north. If you don’t want to get water from the standing waters of Snag Lake, then Grassy Creek is your last chance to fill up on water.
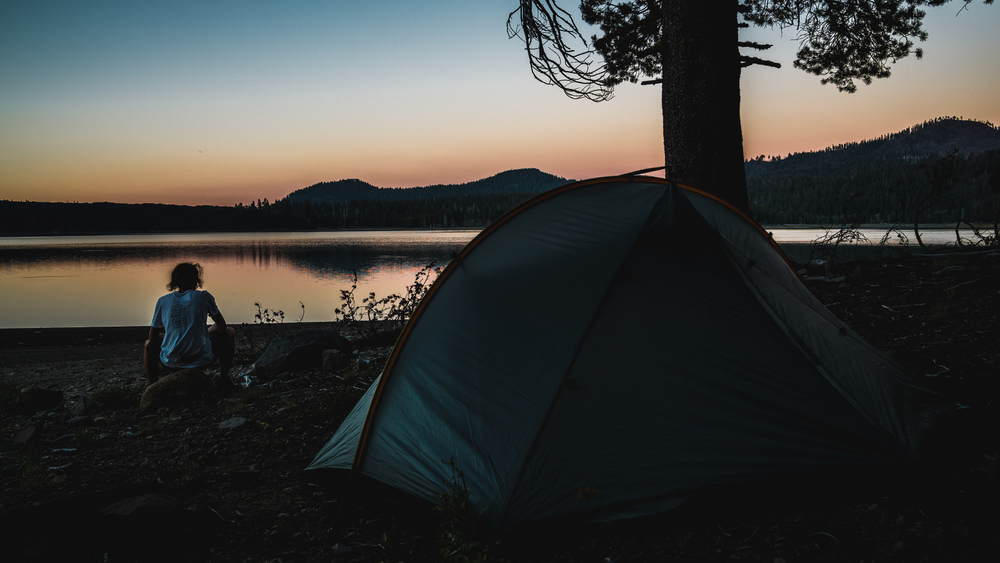
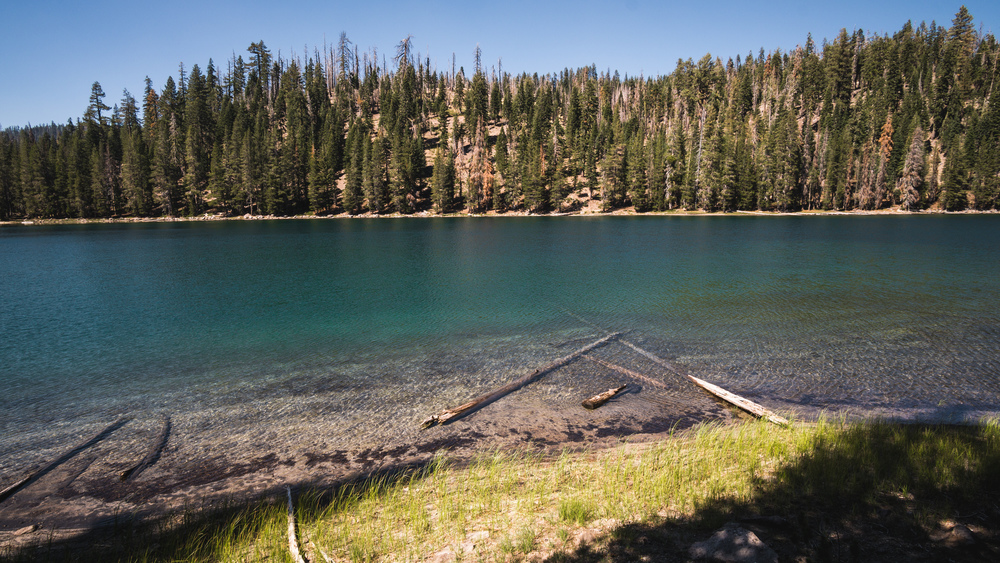
Finally you reach Snag Lake. If you are doing this on a weekend there will be other hikers camping along the lake (when I did the hike, there were 3 groups camped along the eastern edge of the lake, and the next morning I spotted two more tents on the small beach at the northeastern end), so you might have to walk a bit along the lake to find a secluded spot all for yourself. I found a beautiful one on the small peninsula at the southeastern end of the lake.
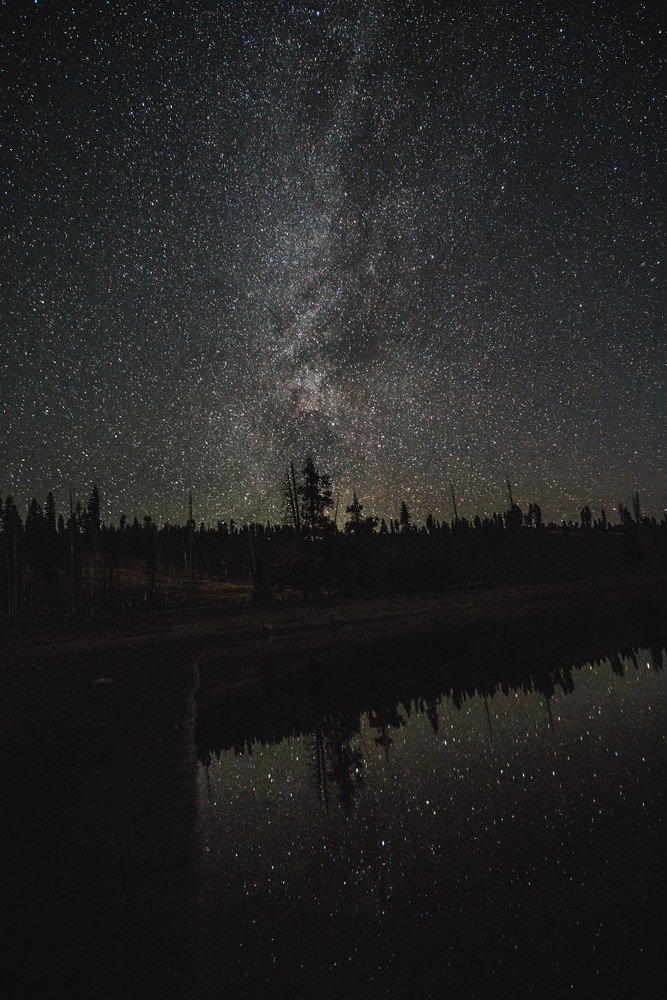
The lake is quiet and a great place to be camping to watch the stars later in the night. Before the sun sets, be sure to check what animal tracks are near your camp site, just so you don’t get surprised at night. There had been some deer tracks near the water, but not where I had pitched my tent. Still, ten minutes or so after switching off my camping light, there was a dozen deer that surrounded my tent as they walked out of the forest to the water’s edge.
Legs 2: Snag Lake -> Cinder Cone -> Summit Lake
Yesterday’s hike was nice, today’s hike will be spectacular, take my word. There will be, however, far fewer water sources, with no water between Snag Lake and Rainbow Lake, so be sure to fill your bottle at Snag Lake before setting off.
Depending where you set up camp along Snag Lake, you’ll have a 2-3 mile hike to Cinder Cone and you want to be there shortly after sunrise (the light will be best and there won’t be many, if any, people that hiked from Butte Lake campground yet), so get up early, have a quick breakfast, pack your tent and set off.
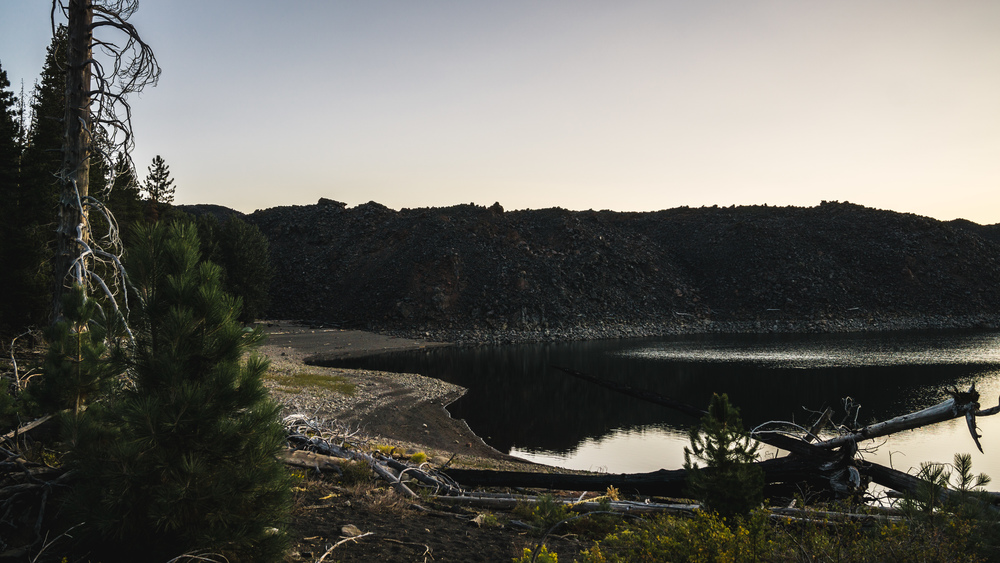
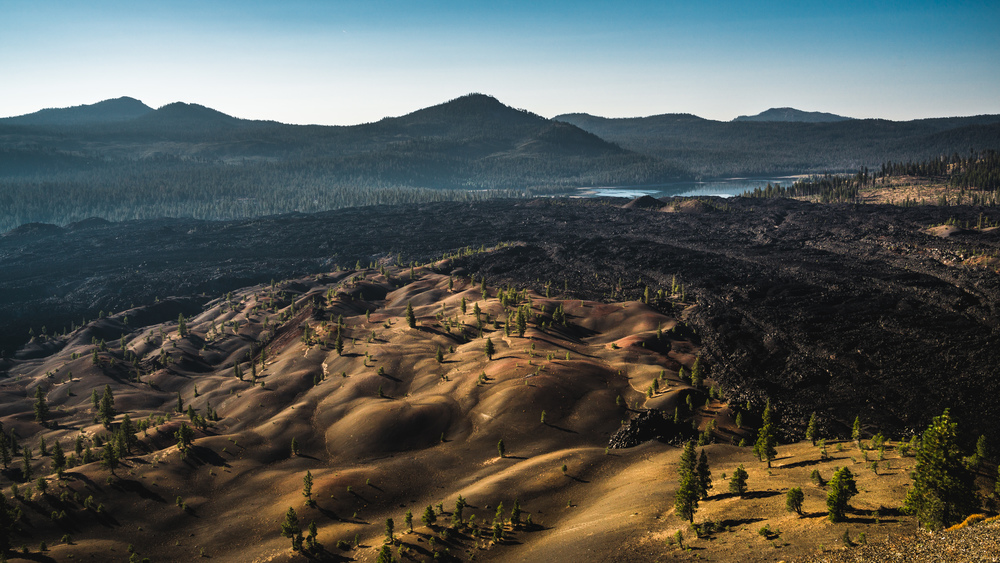
As you reach the north end of Snag Lake you get a first taste of the spectacular geological features that are to come: there is a sheer wall of black rocks, a good ten to twenty meters high, that forms the northern boundary of the lake. This is the southern end of the Fantastic Lava Beds. In fact it is a natural dam wall and the reason why Snag Lake exists. Cinder Cone, which is a, wait for it …, cinder volcano, erupted twice in the mid 17th century (hence quite recently by geological standards) and spew out ash and lava which then cooled to form what is now called the Fantastic Lava Beds. Those lava flows dammed various creeks, thereby creating Snag Lake to the south and Butte Lake to the north. In fact Snag Lake still feeds Butte Lake by water that seeps through the lava rocks. The lava beds are a truly stunning sight, and you will get a good view of them from the top of Cinder Cone (see the cover image for this post, which shows Butte Lake and the northern end of the lava beds). In fact the striking appearance of the lava beds meant that people in the 1870s initially thought that they were formed only a few decades ago. You can also clearly see the lava beds from aerial and satellite images on Google Maps / Earth or Bing Maps etc.
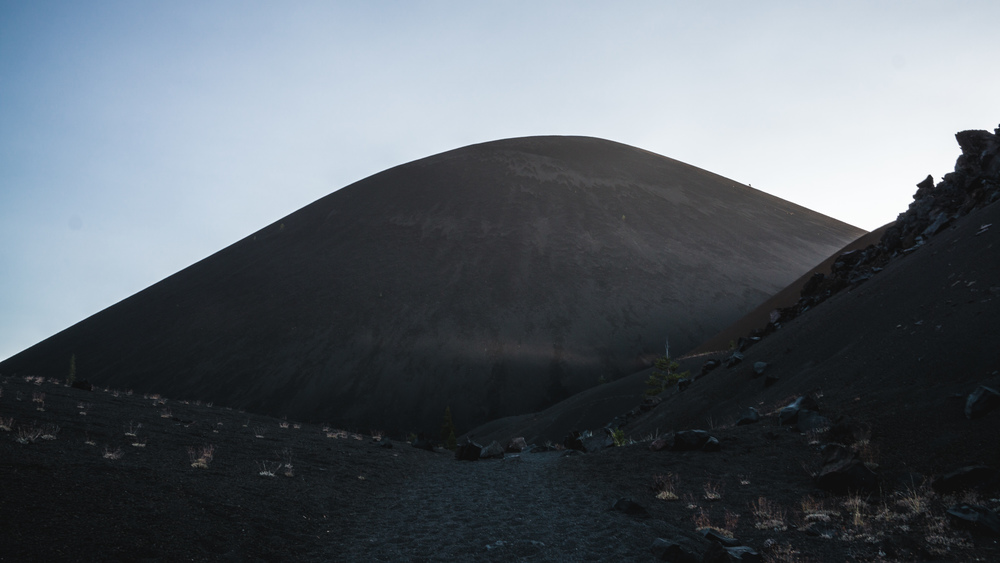
Anyway, after Snag Lake, the trail continues pretty much all along the edge of the lava beds until you get to Cinder Cone. It’s an epic sight, and with all those black and red cinders you might as well be on Mars were it not for the surrounding vegetation.
The ascent, especially with your hiking backpack, is tough. It is very steep and the ground is quite loose, so it is difficult going. The good point about going up from the southern side is that you can just stop now and again, turn around and enjoy a marvelous, incredible view: Lassen Peak in the distance and the Painted Dunes nearby.
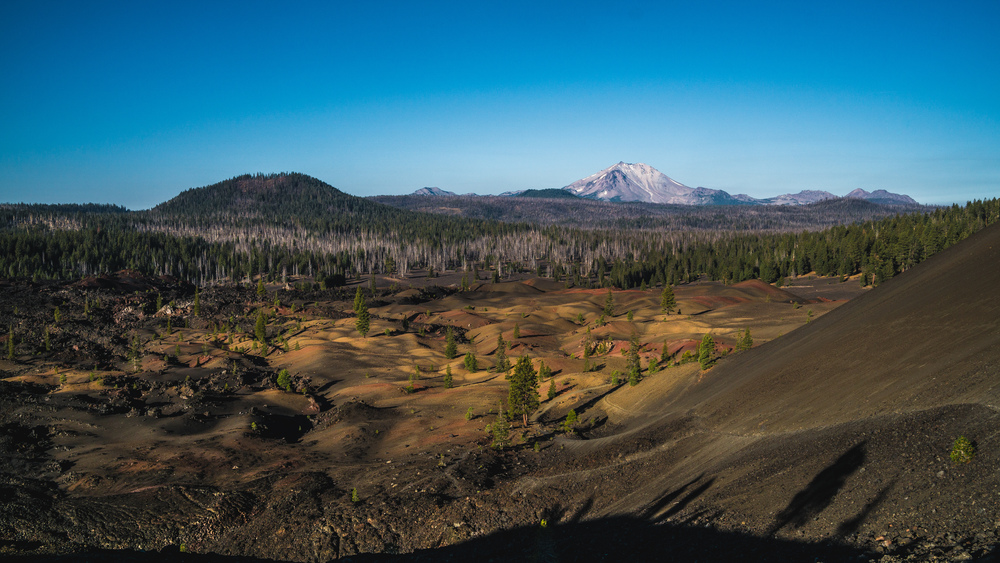
The eccentric colours of the Painted Dunes are caused by volcanic ash that oxidated as it fell on the still hot lava flows. Also if you look carefully, you can see red rocks in between the Painted Dunes and the lava flows to the south of Cinder Cone: these are the remnants of an earlier cinder cone, or scoria cone, that was destroyed by the later lava flows. In fact the Painted Dunes are sitting on lava flows from this earlier cone, with the ash of more recent flows sitting on top. The Fantastic Lava Beds, as well as the Painted Dunes, are all deposits from several eruptions of the two scoria volcanoes.
Anyway, as you struggle your way up Cinder Cone, you slowly get to appreciate the full scale of the Fantastic Lava Beds — it’s a huge area, stretching completely from Cinder Cone to Snag Lake and from the to Butte Lake and then back to Cinder Cone. Lassen Peak in the background adds even more drama to this incredible natural scenery.
Once you are on top, you can actually walk right down into the crater (though, mind you, you have to hike back up out of there), you can walk around the inner rim, or along the outer rim from where you get dramatic views in every direction. The landscape here is so gorgeous, you just want to run around in excitement like a child, stop, take in the view, scream out in joy or awe, run around some more, stop again, scream again etc. Thankfully the air is thin here and you spent so much effort to get up here, that you don’t actually do this, and instead just walk around, murmuring ‘wow’ now and again. If the ascent hasn’t done it, the view here will take your breath away (see again the cover image for this post).
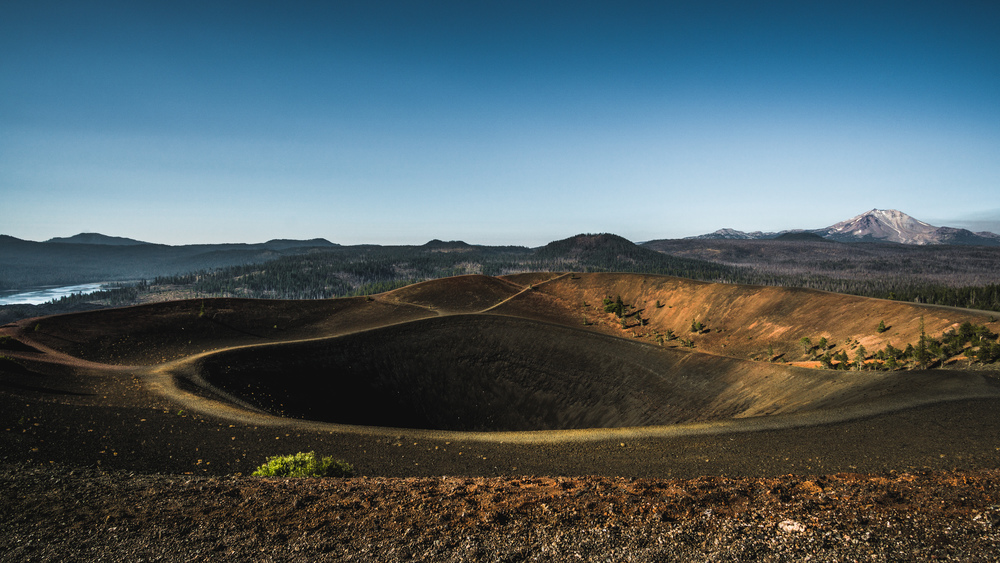
Needless to say, with such beautiful surroundings, it is a great idea to take that apple out of your bag and have a bit of a snack. Stay as long as you want at Cinder Cone — it is by far the highlight of the hike. But then, when you are done, go down the north side, then take veer almost 180 degrees back onto the bypass trail and head back down along Cinder Cone and the lava beds. Originally I had planned to fork off right onto the Nobles Emigrant Trail at the first crossing you get to, then take the PCT or the Cluster Lake Trail to get back to Summit Lake. However the ranger at the wilderness office had advised me that this area has been much ravaged by the 2012 Cluster Fire and so would not be that great to hike through. Hence I opted to only fork off to the right at the junction with the trail leading to Rainbow Lake. The trail will take you uphill for a bit and there won’t be much shade here (most trees around here are dead too), so since it is now getting to be late morning, you will get hot and it will feel to be a tougher uphill hike as it really is. Anyway, soon enough the trail goes back down again to Rainbow Lake.
From here, you just string up the lakes to get back to the trailhead: Lower Twin Lake, Upper Twin Lake, Echo Lake and finally Summit Lake. All of these lakes have clear, blue, refreshing waters, so really do take the chance and go for a quick swim in one of them (I took a dip in Lower Twin Lake) — this will cool you down (even in late summer, early autumn the water will be cold, though you will get used to it quickly) and nicely breaks up the hike for a bit. Do watch out for bears though, certainly leave no food outside, as bears tend to be active around these lakes.
After Echo Lake, you will have to do a last ascent to a pleasant plateau with good views towards Lassen Peak before you head back down to Summit Lake. If you enjoyed this hike as much, you will pretty much be the happy, smiling hiker stepping off the trail onto the parking lot at the trailhead.
Data files (click on the links, then download whatever format you prefer from the gpsies site):
Leg 1: http://www.gpsies.com/map.do?fileId=xpbkcrwutijpxeae
Leg 2: http://www.gpsies.com/map.do?fileId=qnlebscbljhfenlu
Complete route: http://www.gpsies.com/map.do?fileId=waepujmeqbshyzcc
How long?
2 days, 1 night (though to be fair you have to spend a first half night driving up from Las Vegas…)
How many miles?
540 miles / 870 km (of which ~18 miles are hiking not driving)
How?
Road trip + short wilderness backpacking trip
Map required for driving optional for hiking, compass optional (i.e. you can clearly see where you have to hike to in Panamint Valley)
Maps?
National Geographic Trails Illustrated Map #221
Itinerary:
Las Vegas -> Dante’s View -> Zabriskie Point -> Badwater Basin -> Artist’s Palette -> Panamint Valley -> Father Crowley Point -> Owens Lake -> Rhyolite -> Las Vegas
Leg 1: Las Vegas -> Dante’s View -> Zabrisikie Point -> Badwater Basin -> Artist’s Palette -> Panamint Valley
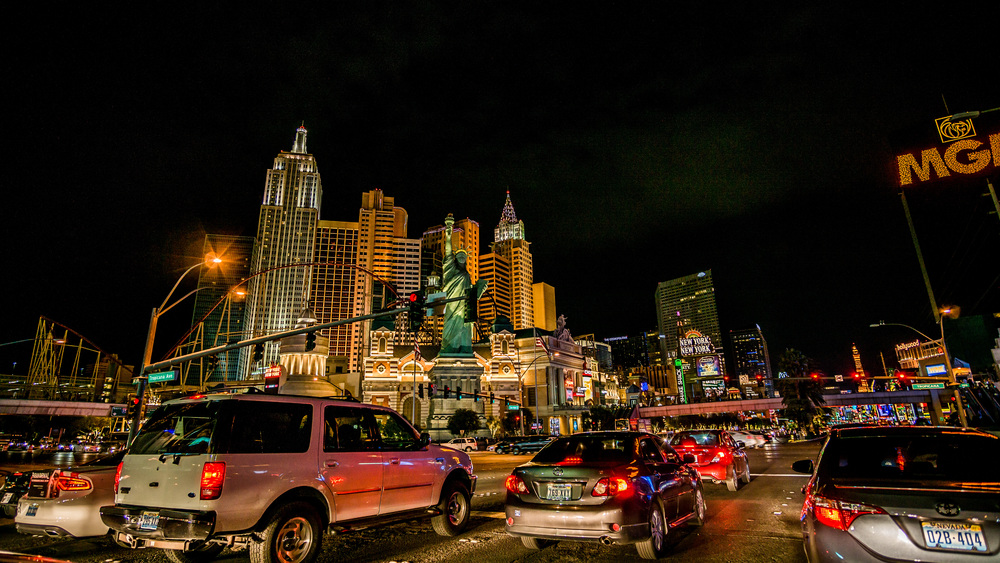
You want to go to Death Valley to seek solitude? Well, the best airport to get there is Las Vegas, so you’ll have first to escape from the weird concentration of human life and folly that is Las Vegas. Now, I had never been to Sin City, so I was looking forward to seeing all those kitschy hotels-cum-casinos that I only knew from films. Once you got your rental car, you can either speed out of Las Vegas on interstate 15 or you drive leisurely (even at night there seems to be a lot of traffic) along the Vegas Strip before heading onto route 95. I had arrived at 11pm and did not plan to be in Death Valley before 5 or 6am, so I had plenty of time and did the latter.
Now if you arrive like me at 11pm or midnight, you have plenty of time to drive up to Death Valley. I caught a bit of sleep on the flight over from NYC, but still, your internal clock will be a bit upset and you will get tired behind the wheel. So you can either drive to a motel along the way or, if you are a cheapskate like me, you can head to the Amargosa Valley rest area at the junction of routes 95 and 373. From Las Vegas it will take you about an hour and a half or so to drive up to here and it will be just over an hour from here to Dante’s View, where you want to be for sunrise. So you will be able to take a nap for a couple of hours in your car (or motel if you went with that option). Hell, at the rest area there’s even a weird Alien / Area 51 store which runs some kind of a truckers’ brothel on the side. The truckers that came out of there looked like you can spend a good few hours in there too! Anyway I also stopped on the way up from Vegas at a superstore to buy a few gallons of water and some food for the entire trip, so you should also calculate some time to do that.
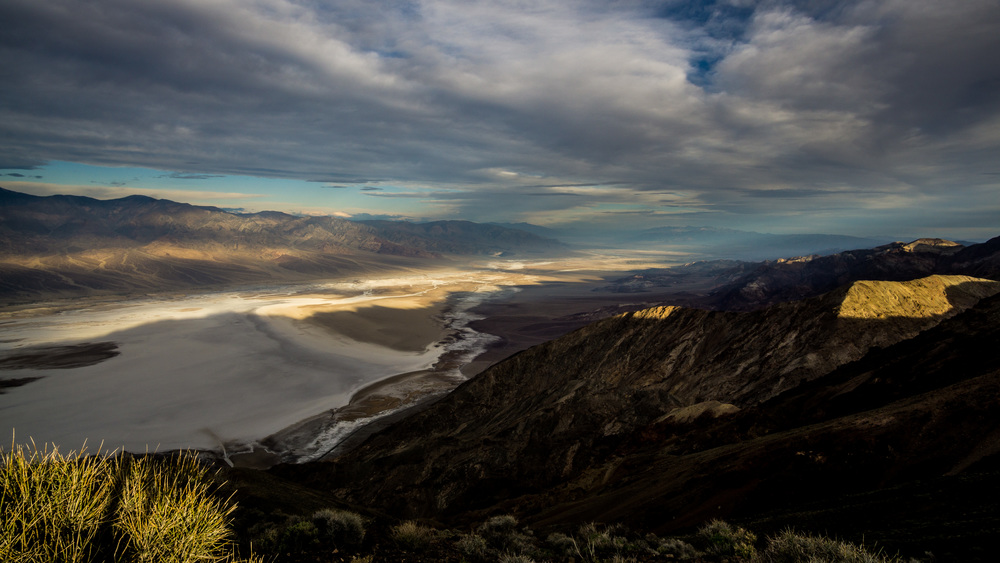
Now, depending on what time of the year you do this trip, you want to leave between 4 and 5am from the Amargosa Valley rest area so as to arrive on top of Dante’s View for sunrise or shortly thereafter. If you don’t have an America The Beautiful multi agency pass, don’t forget to stop at the park entrance to pay your fee at the machine. Dante’s View is the best place to start your trip in Death Valley: you get a full (on clear days) overview of the entire valley from north to south. Badwater Basin lies pretty much straight ahead at your feet and you can clearly see the expanse of the salt flats. Telescope Peak (the highest point in the park) is just opposite across the valley. As the sun rises, the valley slowly catches its rays and lights up. You can hike for a bit along the ridge — a great way to stretch your legs after the drive up here.
Once you filled up on the georgeous view, get back in the car and take the short drive down the mountain and to Zabriskie Point. If you’ve seen Antonioni’s film you probably want to strip naked and make love with someone, anyone, but it’s not a great idea: you’ll probably get arrested. Zabriskie Point is probably THE most iconic scenery of Death Valley. Most people will just walk up the viewpoint from the car park and snap a few pictures (like the feature image of this post), but I highly recommend you take a short hike (or do the full loop; about 6-7 miles) in the badlands. You’ll get up close to Manly Peak and be quite on your own. Considering how much other stuff I wanted to cram into the day, I only did a short 2 miles loop rather than the full hike.
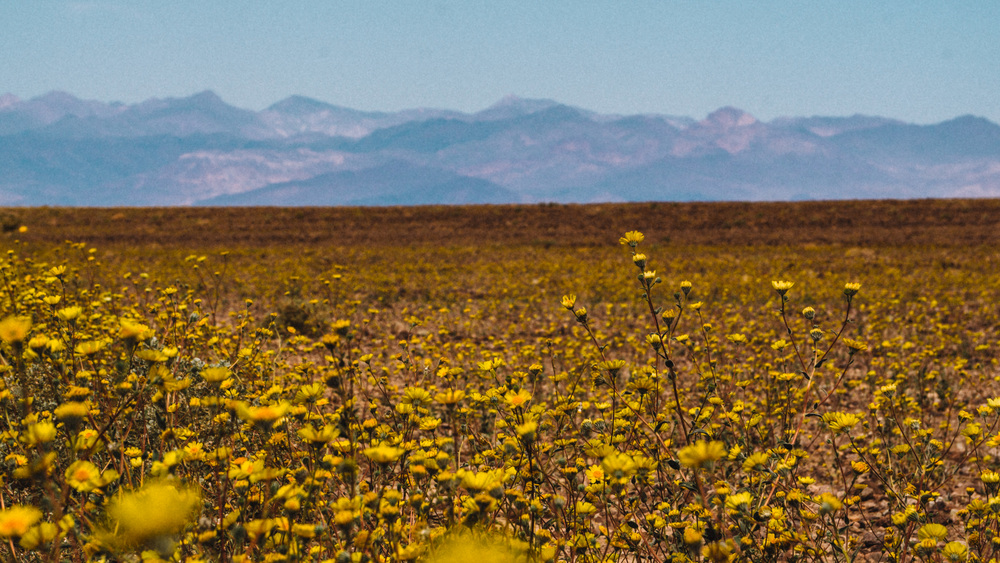
Next up: drive to Badwater Basin, passing through Furnace Creek, where you can get some food, drinks or gas if you are in for any of these. At Furnace Creek, take a left turn onto Badwater Road and from here it’s a magnificent drive down to Badwater Basin. If you do this in late winter and there was a lot of rain in the weeks / months prior, you can get lucky and witness a superbloom: the valley just turns yellow with wild flowers. This was the case in March 2016 and it was stunning!
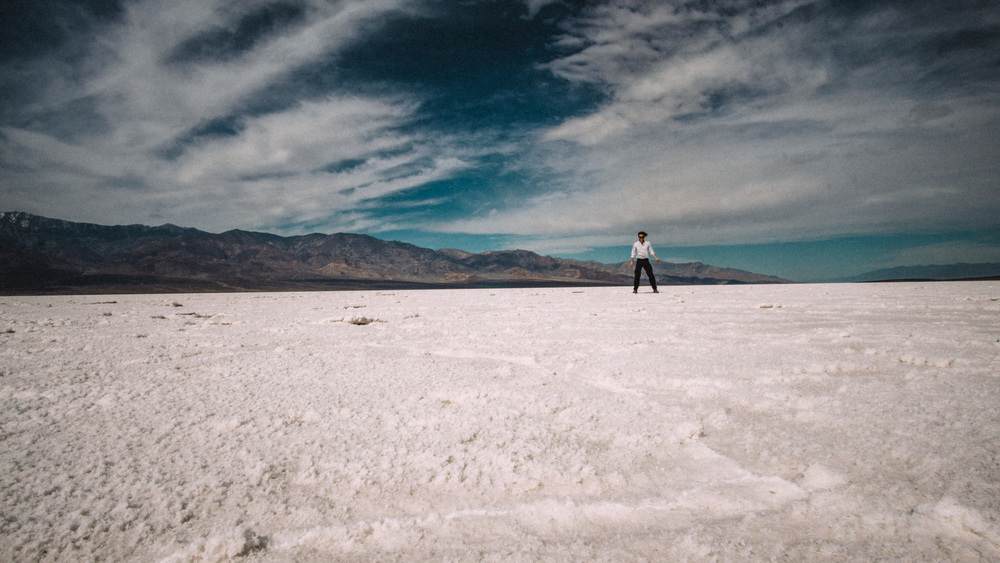
When you get to Badwater Basin, you will probably struggle a bit to find a parking spot (I just parked a bit further down the road), but do get out of your car and walk out onto the salt flats — you will feel as if on a different planet. If you do this trip in summer, do not attempt this without sunscreen, sunglasses, a hat and plenty of water or you’ll be in trouble in no time. Even in early March it was pretty hot out here and blindingly bright as the salt reflects most of the sunlight.
When you have had enough, walk back to your car, and drive back in direction of Furnace Creek. However before you get all the way up there, be sure to take a right turn signposted for Artist’s Palette. It a nice drive through rolling badlands, and mid-way through you get to the namesake badlands with all their splendid colours. You can take a short walk / hike here too if you are still good in time.
After this, drive back up to the junction with route 190 at Furnace Creek. Go left now, driving north past Furnace Creek, then west through Stovepipe Wells. Backcountry permits are optional in Death Valley and you can backpack pretty much anywhere (though no camping on the lower Death Valley floor), but it is a very good idea to get one in case of emergency (the rangers will know where you planned to go). You can get this at either the visitor center at Furnace Creek or the ranger station at Stovepipe Wells.
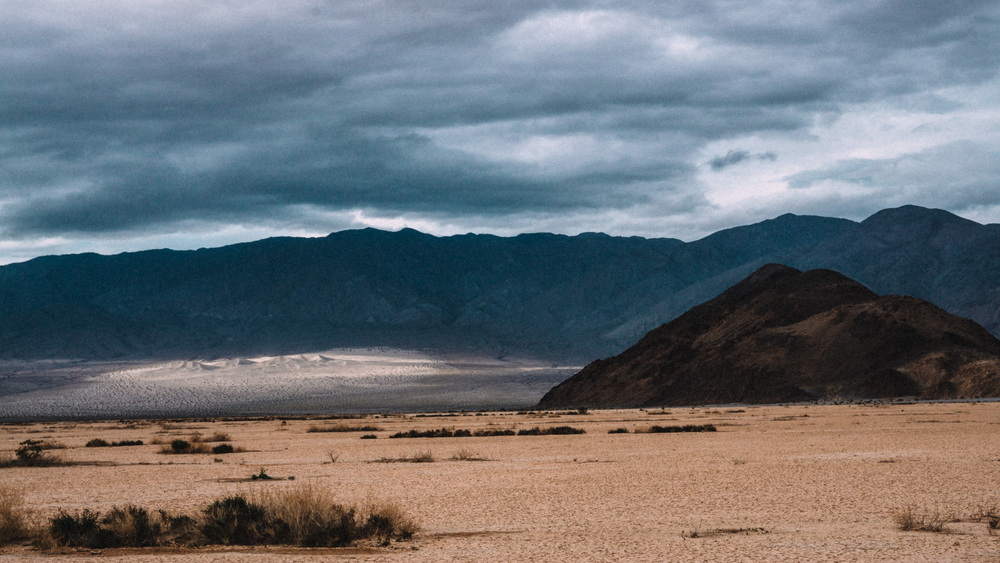
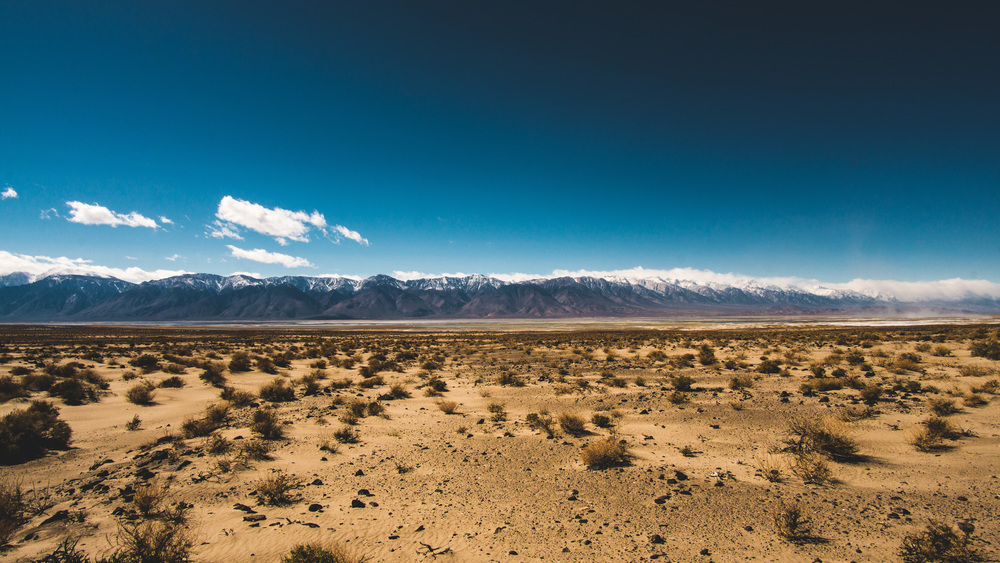
Continue along route 190, crossing the Panamint range into Panamint Valley. In the valley there will be a road going left / south to Trona and beyond. Before this, a little under 2 miles up the road, is a small dirt road going off to your right. Take this road. If you want a longer hike (what I did), then just park your car on the side of this dirt road and set off for the Dunes at the end of the valley (7-8 miles one-way). If you want a shorter hike, then continue the dirt road until its end, and from there it’s a shorter 3 mile hike to the dunes.
Overnight hike: Panamint Dunes
My original plan had been to drive up to Ubuhebe Crater, then take the long dirt road to the Racetrack and spend the night there. However there were several reasons why I did not do this: i) it is a long drive up there and a longer drive on the dirt road down to the Racetrack, ii) you cannot camp next to the road anywhere and you should camp on a small campground south of the Racetrack (or you need to park you car along the road and hike out for at least a mile), iii) I was on my own in a small economy car, so if I had gotten more than one puncture along the dirt road or stuck in loose sand (a real risk from what I’ve read) I would have been in serious trouble. So if there are a few of you, you have a high-clearance 4×4 car and you have a bit more time at your disposal, then I would still urge you to do this: the sliding rocks of the Racetrack are another key Death Valley sight.
My back up plan was to hike to the Panamint Dunes: an easy hike: flat and impossible to get lost as you see where you need to go all the way. That said, it’s not the most exciting hike, since the scenery never really changes. You are also quite exposed to the elements, so if the sun is fierce or there is a sandstorm in Panamint Valley — don’t do it. Panamint Valley is also a training area for the local airforce bases, so if you are seeking solitude, the noise of jets flying overhead might not be what you are looking for. That said, watching their crazy weaponised ballet in the sky is pretty spectacular in itself.
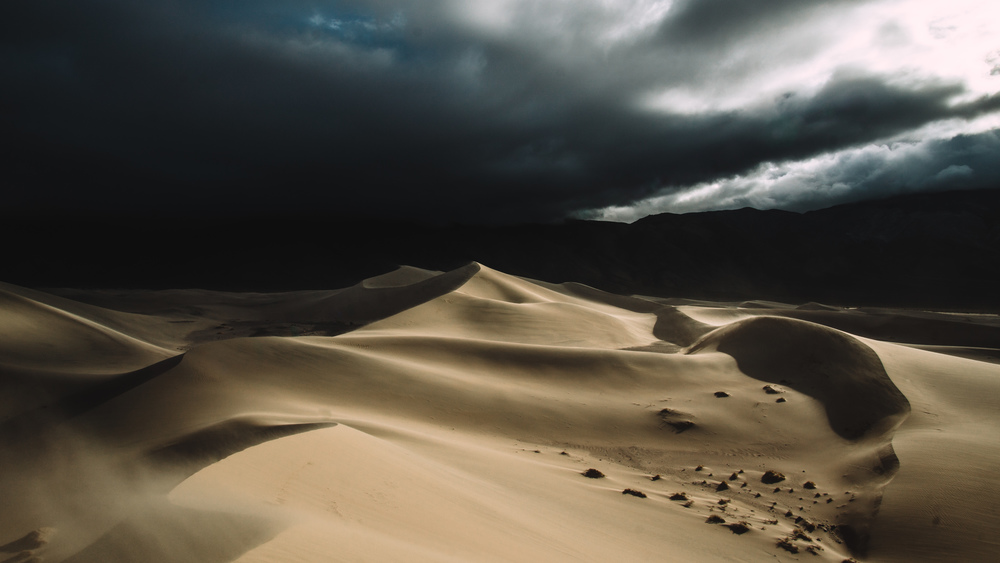
Now I have to admit, camping at the foot of the Panamint Dunes was not the brightest idea I’ve ever had. It was quite windy (I think it is always windy in Panamint Valley), and even though I pitched my tent somewhat sheltered by a big bush, I did not spend a quiet night and feared constantly that my tent would be blown away. Also the sand gets blown up to the norther end of the valley (that’s why the dunes are there in the first place!) and it will get blown under your tent’s raincover and through your mosquito net. In fact the mosquito net will filter the sand so that all your stuff (including yourself) gets covered in very fine sand.
The upshot was, that in the morning I was up early, and had the Panamint Dunes all to myself. There were a few storm clouds from the windy night that were just beginning to disperse and when the sunlight hit the dunes, it was just magical.
I packed up my tent and stuff before setting out into the dunes and I left my backpack near a bush so that I would not have to carry all that stuff up onto the dunes. If you do this, take good note of your surroundings as finding you backpack later can be much harder than you think.
Once you have had enough running up and down the dunes (they are really high, so be aware of this if you’ve got vertigo), get your backpack and hike back out the way you came.
Leg 2: Panamint Valley -> Father Crowley Point -> Owens Lake -> Rhyolite -> Las Vegas
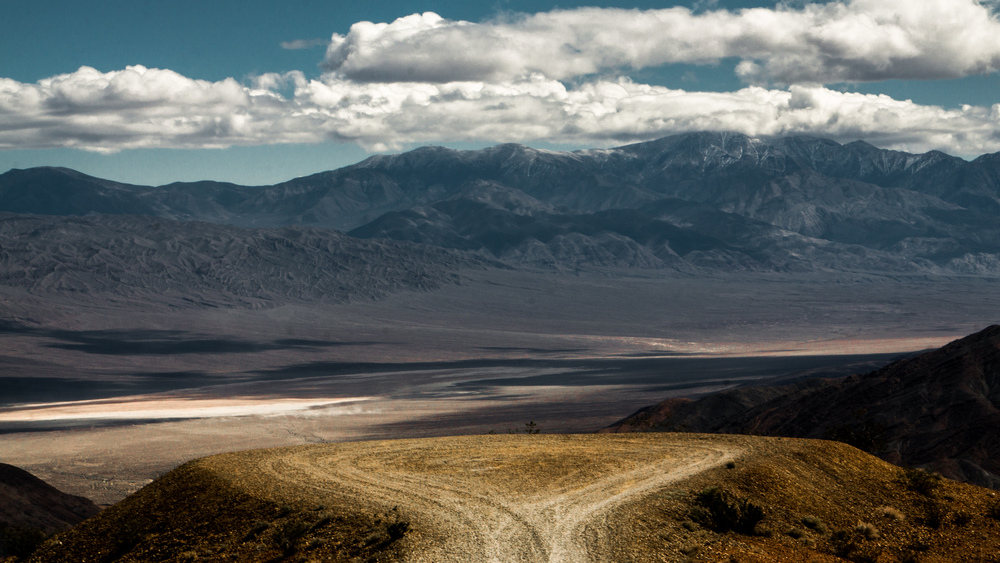
OK so day 2 in the desert. You will probably spend most of the morning in the dunes and hiking back to the car (unless you did the short option). You will also need to get back to Vegas for your flight back in the evening. So not that much time left, but still plenty enough to see a few things. First off, overlooking the valley you just spent the night in is Father Crawley Point. To get there, simply continue along route 190 which snakes uphill out of the valley. The first exit on your right, sign-posted Father Crowley Point, is the one you want to take. You can either leave your car at the main parking lot, or drive the final mile on the dirt track. I hiked, but it’s up to you. The turn-around point of the dirt road makes for quite a fine view over Panamint Valley with good views over the valley floor and Telescope Peak on the far end.
After this, get back into your car and continue along 190. You will reach a plateau and, if you have never seen them before, watch out for the Joshua trees on either side of the road. As you continue along 190, get ready to be blown away by the sight of the eastern Sierra Nevada as the road bends downhill into Owens Valley. If you are like me, you will have to stop several times along the road, get out of the car and just scream in excitement at this sight.
Finally, as the road reaches the valley you will come to a junction: route 190 veers left / southeast to Olancha whereas straight ahead (northeast) starts route 136. At this junction is a handy little parking lot, where you can park your car and walk a bit towards Owens Lake. There is also an informative panel with a bit of history about Owens Lake. Now this is a mostly dry lake, but there is still some water. The reason is simple: you are standing in front of the single biggest source of dust pollution in California and the state decided it was a good idea to divert some water here to keep the worst of it at bay. Owens Lake used to hold much more water in the past but fell victim to the Californians thirst for water and much of the river feeding it was diverted into the Los Angeles Aqueduct. Flanked by the glorious Sierra Nevada mountains, the place does not look that bad, but sure enough when the wind picks up you can see the sand flying around. In fact you can see it being kicked up on the picture above. It’s a lovely spot for a picnic and the road down to Olancha is pure American road trip scenery, so enjoy the view.
Finally get back into your car and head back towards Death Valley: after all you need to get back to Las Vegas. You can take the longer way and after you go past the Mesquite Sand Dunes, take a left, and then immediately a right to get onto the Daylight Pass Road. It is a glorious exit from Death Valley, so do stop at the top for a farewell view over the valley.
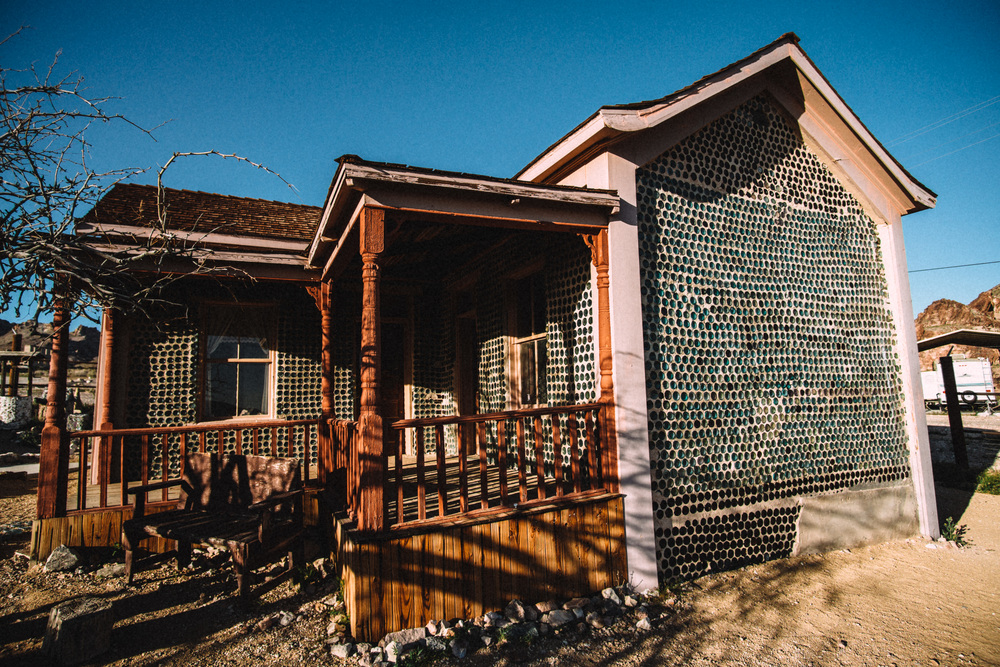
Continue all the way to Rhyolite, Nevada. This is a ghost town now. It was founded as recently as 1905 after a gold rush exploded in the area. The population reached about 5,000 at its peak, but by 1920 the town had been abandoned — the local mine had been hopelessly operating at a loss and in fact closed in 1911. Most of the buildings are in ruins now, but some like the bottle house have been restored. It is a charming little place and it does not take too long to explore it.
Finally, head back to Vegas. If you need food or gas, Beatty, NV, is nearby so do stop there. Sunset will be in full swing as you drive down Amargosa Valley towards Las Vegas. It is an awesome sight, so enjoy the drive.

All in all this is a great, power-charged trip. Probably best to do it on a long weekend or even over 4 days. This gives you more time to explore other areas of this desert park. For overnight hikes, there are plenty of options. I decided for convenience on the simple hike to Panamint Dunes, but if dunes and sand are not your thing, you can easily plan a more exciting route for that bit.
Data files (click on the links, then download whatever format you prefer from the gpsies site):
Leg 1: http://www.gpsies.com/map.do?fileId=znfeagoqcnradnah
Overnight hike: http://www.gpsies.com/map.do?fileId=yephwbvssvxmlqes
Leg 2: http://www.gpsies.com/map.do?fileId=ctmseslrvqkwvnjh
Complete Trip (road + hiking routes together): http://www.gpsies.com/map.do?fileId=hauyjffkbzirvxnm
]]>